Monday, April 30, 2012

One Year Anniversary and Free Sweater Giveaway


It's been a year now!

Blogging has become a meaningful way of recording the wonderful things that happen in my life.  It's been a year now!  Writing about the lovely things in my life (notice, not the un-lovely things) has really opened my eyes to notice all the good things that happen to me each and every day!

So first, a couple of random things...

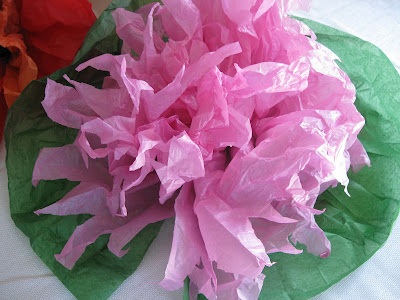
Tissue Paper Flowers

My daughter is helping to prepare her church youth group for a spring garden activity.  She helped me teach a group of young girls to make tissue paper flowers.  Here's where we got OUR instructions.

http://www.marthastewart.com/how-to/tissue-paper-pom-poms-how-to

But do 13-year-old girls every follow instructions exactly???  Of course, not, they instead prefer more creative endeavors - which produced THESE works of art.


It was like walking into a giant flower garden in my Dining Room!  I loved how they turned out.  Thanks Naomi, for all your help.


Macaron Heaven


Second, I think I have entered cookie heaven, and can never return to normal life again.  Sometimes the third time REALLY is the charm.  (But maybe not for everything, like puff pastry dough, which I will NEVER try to make again.)

 I did it, I made real french macarons!!!  Um, yeah, like the kind in fancy french patisseries.  And they were simply amazing.  Here is a very good reason to be my friend - someday I might make you some - if you are really lucky :) 

After two previous failed attempts, I think I found the holy grail of macaron recipes, from of course, America's Test Kitchen.  The trick is, as it is with any of their recipes, that you have to FOLLOW THE INSTRUCTIONS EXACTLY.  Difficult to do if your an impulsive sort of person like me, but persevere, the results are well worth the extra discipline.


Ok, so they may not look as perfect as the ones that come from a good pastry shop.  But they were heavenly, with lightly crisp outsides, chewy insides, and everywhere the fragrance of almonds.  Not to mention the amazing buttercream between them.  Yes, it's cookie/pastry Nirvana.

Sweater Giveaway

And Finally, we come to the Sweater Giveaway.


After I made the first Leaf and Lace Sweater, (or is it Lace and Leaf??)  I loved it so much I wanted to immediately make another one, even though I had no intended recipient for it.  I have had so much positive feedback and kind comments from facebookers, friends, and family about my blog, I decided to give one away for free!  Thank you ALL for all your nice comments and compliments - they have been so appreciated.


The Rules


So here's the official rules I guess.  Leave a comment here on this blog post, or on my facebook link to this post, with enough info that 'I' can identify you, and I will put your name into a drawing for the sweater.  Something like, "I want it".  Please DO NOT enter twice.  After one week, we will randomly draw a name, and I will contact you for your address, and mail the sweater to you - gift wrapped!  The last day to enter is May 7th. 

Oh, and a NOTE: The sweater is a size 6 to 12 months, and might fit an older baby as a shrug.


I sure wish I could knit every little baby I see something beautiful - and while I sometimes make myself crazy trying (cause I love it!)  I do have a pretty hectic and crazy life!  So enter, and you might get lucky, or have a nice gift for someone you know and love........


Capturing a Moment


Dad and Daughter have been oil painting together in the evenings.   I  love watching the way they interact and the special bond they have.  I sure did marry in to some amazing artistic talent!


Saturday, April 28, 2012

My Dream Kitchen - Part 2

After the Demolition


Thanks for being patient with all the ugly/messy stuff :)  If you missed the previous post with the demolition and all the ugly brown, it's right here.

After all that demolition, we started slowly rebuilding the kitchen.  I had always dreamed of a black and white,  French farmhouse kitchen, unfortunately, there wasn't much original charm there to save, and so we added back as many old-fashioned details as we could, on a budget.  And REALLY on a budget. 


The Beadboard


We started by applying beadboard to the walls.


Gotta love the tell tale sign of my working husband:  The big gulp cup from Circle K!


We were a bit frustrated with the batch of beadboard we bought, it was nice wood, but it was full of holes we had to fill, slowing us down even further.  After we painted it though, it made it look even more 'authentic.'  It matches the old beadboard already in our house on the mudroom ceiling. 


To Drywall or Not, That is the Question


I had this crazy stubborn dislike of drywall at that point.  Partly because I was trying to be an old house purist, and partly because we had an extreme hatred for drywall dust, after having just finished the living room.  We decided to try some wood paneling - yeah, seriously, on the walls, which didn't lay flat or look right, and so our project stalled for a bit. 


At that point, we went through some really hard times.  The months that we were working on this kitchen were really tough.  We were in the middle of a diagnostic process to determine weather or not our son had Autism, I was getting ready to have a baby soon, with some complications and a 'bedrest' prescribed throughout most of my pregnancy, and Eric's father passed away.  We still miss him every day! 

My brother-in-law and a team of good Young Men from our Church came and helped put up drywall in place of the paneling.  It got us off and going again, and we will always be very grateful!


We also had to level out the sagging ceiling in the kitchen too.

Counters and Cabinets


Finally it was time for new cabinets, counters, and a sink!!  Yeah!!  Because we really did this on a budget, we went with IKEA cabinets and products.  I have mixed feelings about that, because the quality really isn't that great, and they defintely are showing their wear after 7 years, but it was the difference between being able to remodel the kitchen or not at that time - and I've been really happy with the way they look.


We chose white 'beadboard' style cabinets.  I was a little worried about beadboard on the walls, and beadboard again in the cabinets - but I guess I can't get enough, cause I really love how it turned out. 


It's the usual mess, but starting to really look new and different.


Our Lovely "Pressed Tin" Ceiling

And here's my favorite part of the whole project.  We purchased a special ceiling paper from Lowe's with an embossed relief in it.  It was inexpensive, but looks so much like pressed tin that no one has been able to tell the difference unless we mention it (which of course, I just did).  This is a wonderful memory for me, we had a family wallpapering party, and took turns working and holding my new
baby :)


I think Alain was about two weeks old here.  Here's his Uncle doing a baby shift :)


We figured wallpaper was easy enough, so the ceiling paper should be too.  Not quite so.  This was heavy paper and we were working against gravity.  I still have this memory of my Mom standing there with a towel-wrapped broom holding the paper up on one end, one person on a ladder in the middle holding it up, and another person on a ladder applying it to the ceiling.  It took three people working against gravity to get that stuff up!


Don't we all look thrilled to have our picture taken?

Here you can see we are applying my lovely black and white kitchen wallpaper.  I should say normally that I'm not a big fan of busy prints - I love nuetral colors and white, but I really wanted a French Country feel in the kitchen, and this really worked out to give it the look I wanted.  So after removing all that wallpaper, we added some right back on! 


The Floor

Then came the flooring, again on a budget, we chose to apply black and white vinyl tiles on a diagonal.


We are getting closer........


 Only one more post, I promise, will be the last of the kitchen series.  It was a project that took us a long time, but the Reveal is comming..........


Capturing a Moment


Not even two, going on twenty! Yep, my baby is growing up way too fast.  I promise I did not pose her for this picture.  I think I might be in trouble though.


Sunday, April 22, 2012

My Dream Old House Kitchen - Part 1

The Old Kitchen

Ahhh, Don't ya love the brown wood paneling?  And the white formica and floor?  


Soon after moving day we started the kitchen remodel.  The DR/LR we finished one month before.

We were a bit crazy to do this while we were living in the house, I was pregnant, and we had little ones running around. Looking back, I am grateful for having had one exceptionally easy toddler who stepped OVER the power tools on the floor without even thinking to pick them up.

Here I am very pregnant and planning the remodel on our makeshift table
We moved everything out into the LR while we worked. 


Remember the chimney removal project in the Dining Room?  The OTHER side of that chimney ran right smack through the kitchen cupboards and when it came out we were left with a hole to be patched in both the ceiling and the floor. 


looking down into the basement


Then we had to purchase a HOUSE JACK and lift a sagging spot in the kitchen floor from the basement.  This was one of the quirks we knew about from the beginning, and wasn't too hard to fix.  Old houses often have sagging floors and ceilings. 


That took care of MOST of the sag.  The rest took some floor patch.


Yeah!  The floor is level.


Then the demolition!!!


First we removed the false kitchen ceiling.  We didn't take pictures of this, as it was a pretty impulsive thing to do, which necessitated the kitchen remodel beginning so quickly in the first place.  And I should have a picture of the cobwebs that were behind that false ceiling, but honestly it was around Halloween time and it was pretty much one of the most freaky, disgusting things I had ever seen!

But here goes......

Eric, removing the upper cabinets


It was a pretty big mess. 

The Surprises


Water damage under the sink.


The ironing niche and the hot wires beside it.


It seemed a crime to cover up the pretty green beadboard, but had to be done.  Was an old ironing niche, where you'd swing down the board to get that ironing done.  What was scary was right next to it.  Two hot wires!  Yeah, basically they cut a live wire and left the ends dangling in the wall.  It's a miracle the house never burned down!

AN EXTERIOR WINDOW, in the middle of the house??? You'll see it, boarded over, in both these pictures.  Which can mean only one thing, our house, had a very different original blueprint.  It was probably a very small home, with a really LARGE addition put on, probably in the 1910's.  Mystery is:  We have no idea what the house originally looked like, or what the footprint was.  We still speculate on that, from time to time.


And Layers and Layers of Vintage Wallpaper! 

I think we counted 11 layers in one spot, can't remember if it was the ceiling or the walls.  Some were unrecognizable, others I tried to save, but couldn't get a large chunk of.  Some I did keep for a shadow box someday. 


Off the needles.........

Been one of my busier months, but still managing to get some knitting in.  It's amazing how perfect this craft is for the time-deprived, since it fills in moments where I couldn't have done anything else, like waiting in lines, waiting to pick up kids, waiting for Sponge Bob to be over, etc etc. 

I'm pretty thrilled though with my newest most perfect baby hat.

The Wurm Hat


So my knitting curse is pretty much baby hats!  They almost never fit newborns.  Mostly cause their heads are all so different!!!  You'll notice those classic hospital hats only work because they STRETCH!  So pretty much that's the secret.  If you want to fit an actual newborn, and have it fit more than two weeks you need a VERY stretchy pattern. 

I went looking, but finally found what I was looking for in the adult hat patterns.  The Wurm Hat was perfect on many levels.  First it has funky side ribs that actually match my favorite booties.  Second, it has a really unique edging that is VERY stretchy.  And Last, it's totally slouchy - my kinda hat (I may have to make one of these for me, too.)  And it comes down low enough to cover the ears really well.  A few adaptations to the adult pattern and we're in business!


I really love making baby things out of sock yarn.  It's almost all wool, with just a touch of synthetic for wearability, it's really soft, and its washable!  Best of all the worlds.  This is Paton's Kroy Socks.


My nephew - isn't he a cute model??


 Pattern link for ye knitters here, on ravelry, of course.

http://www.ravelry.com/patterns/library/wurm

Capturing a Moment


 Pinewood Derby.  I so love being the mother of boys!! Racing cars is pure joy :)


Comming Soon:  My Dream Kitchen Part Two - Our black and white kitchen in the making.